Rob Kraft's Software Development Blog

Software Development Insights

Archive for March, 2013

Quickly Get Started With Subversion Source Control in April 2013 – Download, Install, and Use

Posted by robkraft on March 31, 2013

Once in a while I take over a software development project that is not using source code control. If I expect to make a lot of changes I usually set up source code control before I start so that I can easily revert changes I made if I need to. I don’t do this often, so I’m documenting the steps for a quick installation of subversion with minimal source control features for my own future reference.

I felt the urge to write this post for two reasons:

  1. To easily find the correct URLs to use to download the software
  2. To provide simple documentation for a simple installation. There is a lot of good extensive documentation explaining all the options, but I don’t care about most the options. I just wanted the basic installation so that I can get to work. And here it is.

Downloading and Installing the Version Control Software

A Google search for subversion will almost certainly take you to the old web site for subversion.  So skip it.  Download subversion from here:  http://www.visualsvn.com/downloads/  The first link is probably Apache Subversion Command Line tools, version 1.7.8 and about 2MB.  That is the one you want.  Ignore the misleading fact that it is has Apache in its name.  As a windows developer, that information is irrelevant, and frankly, misleading.  Download the file and unzip it to c:\program files\subversion.

Subversion does not include a user interface.  Everything is done from a command line.  So let’s get a user interface for subversion so that we can avoid hours making typos at the command line.  The challenge is to download TortoiseSVN without downloading the other crap put in front of you on the web pages.  This is not easy because huge download buttons will be placed in front of you on most the pages they force you to navigate through and they all download crapware.  So avoid the tortoiseSVN site and go straight here http://sourceforge.net/projects/tortoisesvn/files/latest/download.  This will download either the 64bit or 32bit version based on the OS you are running your browser.  Download it, then run the installer exe.  Take the defaults.

Creating a Repository to Store the “Master” copy of your software.

Now for the hard parts.  Subversion uses poor terminology, in my opinion, for  the actions you need to take to get started.  Conceptually, we want to do the following:

  1. Create a place on the computer to store the “Master Copy” of our source code, called the repository.
  2. Upload our existing source code into the repository
  3. Flag the working directory of our source code as a working directory for that repository.
  4. Make a change, test that subversion recognizes the change.

I recommend you back up your source code root folder to a backup folder at this time.

Create a folder on your computer to contain the Repository.  This is not going to contain the “working copy” of your code, it will contain the “Master” copy.  I recommend something like c:\SVNRepository.

Creating a Folder in Windows

  1. Right click on the folder you just created.  The TortoiseSVN tools should provide you an option to “TortoiseSVN\Create repository here”                             Create Repository Here for Subversion
    1. Do NOT click Create Folder Structure, just click OK.
  2. Now go to the root folder that holds your source code (let’s assume it is c:\DevSource).  Right-click, choose “TortoiseSVN\Import”

     Image of Import

    1. Clear the “URL of repository, then click the … button to the right”.  Navigate to the folder of your repository (c:\SVNRepository)
    2. Click okClick OK to import
  3. Now, to designate the location you imported from as the working copy of your project, right click on the folder you imported from again, and select SVN Checkout

    Checkout from Svn

    1. Careful – the “URL of repository” should be the full path to c:\svnrepository
    2. You may need to change the defaulted value for Checkout directory because the UI may add svnrepository at the end of the path name.  Take that off.  The checkout directory should be the root level of your project folder (c:\DevSource)
    3. It will warn you that the folder is not empty.  This is good – you are going to overwrite your existing project files with the files you imported into the repository.
    4. If you did this correctly, all your files will still contain their original date/times.
    5. If you did this correctly, and you right click on your project root folder, you will have two new options above TortoiseSVN on your menu, SVN Update and SVN Commit:

    Confirm SVN Folder

If you had any trouble, delete SVNRepository, copy the backup you made of your source files back into your project folder, and try again.

Posted in Dev Environment | 4 Comments »

How to POST to a REST API that requires Authentication using Fiddler

Posted by robkraft on March 8, 2013

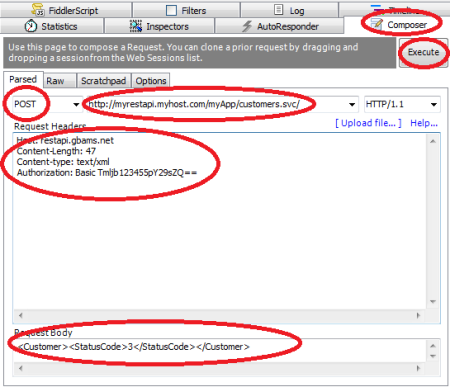
Last October I blogged about using Fiddler to Post to a REST API. Today’s post is very similar but I go one step further and post to a REST API site that requires Basic Authentication. When making a POST to a site requiring authentication, you must include authorization information in Request Header. Sounds simple enough, until you look at an example. In Fiddler, it looks like the image below:

Fiddler Post To Site Needing Basic Authentication

The only piece of information you need to add to make Basic Authentication work is the Authorization: Basic line with the correct encoded value following it.  Despite my warning, this encoded value is easy to generate.  You just need to go to any web site that will do base64 encoding for you, plug in your logon and password using this format:

logon:password

Click the button to encode to Base64 (probably UTF8), and paste the resulting value into Fiddler.  I did this at http://www.base64encode.org as shown here:

Image of Base64Encode.org web site

Image of Base64Encode.org web site

Posted in CodeProject, Coding, Free tools | 2 Comments »

The Correct Way to Re-Throw An Exception – .Net Tip

Posted by robkraft on March 6, 2013

When catching and re-throwing an exception, you should include the original exception as a 2nd parameter.  Including the original exception may provide a deeper stack trace that will assist you with solving the exception.

This syntax may not include the full stack trace.

This syntax may not include the full stack trace.

In the code above, if an error occurs in methodWithoutCatch(), the call stack returned will show “methodWithTryCatch” as the deepest method in the stack.

System.Exception: Additional Error Info: blah blahObject reference not set to an instance of an object.
at WindowsFormsApplication6.Form1.methodWithTryCatch(String y) in ...\Form1.cs:line 34 at WindowsFormsApplication6.Form1.button1_Click
This example will include the full call stack.

This example will include the full call stack.

However, if you include the original exception in the throw as shown in the second throw example, then the call stack returned will show “methodWithoutCatch” as the deepest method in the stack.

System.Exception: Additional Error Info: blah blahObject reference not set to an instance of an object.
---> System.NullReferenceException: Object reference not set to an instance of an object.
at WindowsFormsApplication6.Form1.methodWithoutCatch(String z) in ...\Form1.cs:line 40
at WindowsFormsApplication6.Form1.methodWithTryCatch(String y) in ...\Form1.cs:line 29
--- End of inner exception stack trace ---
at WindowsFormsApplication6.Form1.methodWithTryCatch(String y) in ...\Form1.cs:line 35
at WindowsFormsApplication6.Form1.button1_Click

Including the original exception as the second parameter of your new exception provides you with a better call stack.  In this example, it allows you to determine that the error occurred in the methodWithoutCatch method.  In the first case, you are left wondering if the methodWithTryCatch really caused the error, or if one of the three methods it called (method1, methodWithoutCatch, or method3) caused the error.

Posted in Code Design, Visual Studio 2005, Visual Studio 2008, Visual Studio 2010 | 1 Comment »

Internet Explorer 10 is now the Best Browser in the Market

Posted by robkraft on March 2, 2013

I am loving the speed of the recently released Internet Explorer 10 (IE10) for Windows 7.  It is noticeably faster than Chrome.  It also has no problem rendering video and other content on sites that IE9 struggles with.

A few other minor improvements are nice such as the little ‘x’ added to every text box to allow you to clear the field and the icon for viewing your password that appears in every password protected field.  This is a long overdue security enhancement.  A lot of users choose simple passwords primarily because they struggle typing complex passwords when they cannot see what they have typed.

Text fields and some fonts render a little differently in IE10 than in IE9.  I don’t think they look better, but I think they probably render a little faster.  Once again, IE10 appears to be all about speed!

Posted in Free tools, Home Tech, I.T., Web Sites | Leave a Comment »